• Skip to main content
  • Skip to primary sidebar

Jenmenke

Road Warrior

  • Road Warriors
  • Garden
  • Food
  • Babble
  • Home

Rosemary

How I Spent My Birthday

May 30, 2011


(the most important day of the year.)

We, in Minnesota, are in the midst of about the worst Spring ever. Rain, snow, frost, wind and more rain. It hasn’t been the best environment to garden in.

It. Has. Been. Dismal.

But on the most important day of the year, the sun shone. All day.

And I planted almost the whole garden. On May 25th, all I had in the garden was rhubarb (perennial), asparagus (perennial), garlic and shallots (planted last year), and onions (planted in early April).

And by the end of the day on May 26th, I had added tomatoes, perppers, beans, peas, edamame, cucumbers, corn, zucchini, all my potted herbs, zinnias.

I was tired, sunburned and princess for a day.

I love my birthday!

First I planted my herbs that wintered in the barn all winter.

The sage is so pretty!

The rosemary is a little worse for the wear, but will rebound fine, I’m sure.

Next, I went after that damn, damn “non-invasive” ginger mint.

You might remember that from last year and the year before, when I attempted to dig it out. Over and over. This year, I started with Round-Up. And after two applications, it’s still doing just fine. So I took out the big guns: Round-Up Poison Ivy and Tough Brush Killer. Somehow, I’m not optimistic. But stay tuned for an update in a few weeks.

And speaking of invasive, though on a much cuter level, we visit the ever-burgeoning Johnny Jump-Up population. Which, as predicted last April, has exponentially increased in number. But I didn’t Round-Up them. I probably should have. But I didn’t.

Instead, I dug them all out and placed them inside my round trellis. (All except one, that is.) Something tells me I’ll rue this day.

Needing refreshment, I decided to run up to the house for a drink and came upon Lola, with the door wide open. She apparently wanted a fresh drink too, and let herself in. Then decided to bask in the sun a bit.

Well, hello Lola. You bad dog!

And who is this, lurking among the garlic?

Why, it’s my psychotic rooster, Senor. He has finally figured out he is free.

And our lives may never be the same again. He is scary as Hell. And while he never attacked me all day, he did attack Dave when he got home with a delicious picnic lunch for my birthday! I have a video of it happening. It’s hilarious.

It was a great day. I was so grateful to be able to work outside. Then I had to pack it up and head off to a soccer game. Which isn’t how I’d voluntarily spend my birthday, given the choice. But that’s just the way it is sometimes, kids. And when that happens, I have to act like like a grown-up and not complain. (too much.)

We went out for a late bite at a Mexican spot the next town over. And had Boston cream pie for dessert at home! Like I said, it was a great day.

I should note that the temperature dropped steadily all night and was 34 degrees when I woke up. Looking out the window, I saw what looked an awful lot like frost on the roof of the barn.

Huh. Imagine that.

Filed Under: Garden Tagged With: mint, Birthday, rooster, round up, garden, tomatoes, Sage, Rosemary, johnny jump up, Lola

Tis the Season

March 15, 2010

…For Poop

Sorry for that sick photo, but you either a) get it, or b) don’t. If you don’t, then you obviously do not own a dog in a northern state that receives any appreciable snowfall.

I do.

And I am making my annual rounds on poop duty. It is a thankless job. If you miss the precious window of time where the poop is exposed from under the snow, yet still mostly frozen, all is lost. You will find yourself smearing and fighting waterlogged masses that you would far prefer not to ever have to even look at, much less try and pick up and dispose of.

So that’s what I did yesterday. That and pretty much take all my clothes off and run around in the Mid March Minnesota HEATWAVE! It was sunny, after five straight days of rain and dense fog, only to have the clouds vanish, the sun appear and the mercury soar to SIXTY! In the cities, I heard it got to 64 which was warmer than PHOENIX! Crazy talk.

I worked outside all day and felt my winter fat melt away.

I wish.

The fat. I wish the fat had melted away in one day. Wouldn’t that be awesome? I can’t be the only one who thinks things like that.

I cleaned the chicken coop out and let them outside for the first time since last December

I used the manure-laden shavings to fertilize the raspberries

And to feed the small rodent-chasing dog, known as Poopy. For not only does she like to poop in my house, but she clearly likes to eat it as well!

I spread the rest in the garden which is starting to emerge from under the snow and found these amazing living things!

Thyme and strawberry plants? Do strawberry plants typically look like this after a winter of subzero days and nights? I wouldn’t know because I just planted them last year…

And I found this mess staring at me. I know what I have to do soon and I don’t want to do it…. one of my most hated jobs of spring is cutting the old asparagus plants. In fact, it reminds me that this blog is a year old, because it was one of the first things I ever wrote about!

I raked driveway rock off the grass and nearly died from exhaustion. No photos.

I went in to the greenhouse, found the fat cat lolling in the sun (it was about 80 degrees in there)

Then noticed that my previously mentioned crispy rosemary plants had some glimmers of life (see the brighter green in the second pic)

So happy! Plus, the healthy ones are starting to bloom!

Note cat hair above and to the left of bloom and what looks like a human jennie hair directly behind bloom.

Never mind.

I’m sure we’ll get walloped with more snow and sub-zero temps, but this one day was pure heaven.

Filed Under: Garden Tagged With: thyme, strawberry, fertilize, garden, Overwinter Rosemary, Rosemary, spring, Minnesota, poop, spring clean up

Rosemary Cracker Bread

December 10, 2009

IMG_6864

Go Make Some

I’ll admit, it’s a bit of a pain. But look at that picture! It’s so cool looking. And good! Amazing to behold! And yes, I’ll admit this, too: it’s a repeat.

Remember everyone, my computer died on Sunday. I’m working off the kid’s iMac. It isn’t as bad as I had feared, but for some reason — and I don’t really have time to troubleshoot this week — Aperture isn’t generating thumbnails from my camera. So, I’m using iPhoto for now, and going bare-blog-bones for the next week or two.

The reason I’m reposting the Rosemary Cracker Bread, is because it’s so FESTIVE. And — if you are an overachiever such as I — a PERFECT gift for the holidays. I bought some of those clear cellophane candy-type bags and use a cool twine hang tag to close it up. Fragile packages of bliss.

Anyway, for whatever reason, this video of mine does not get many hits on youtube. Go figure. The ciabatta recipe is racking up the views, but not my sad and lonely cracker bread.

I had to make them recently for the people who won my 8-Months-Of-Bread live auction item. And as usual, I couldn’t leave well-enough alone and tweaked the recipe ever so slightly. Here is my latest version:

IMG_6852

Rosemary Cracker Bread

1 1/2 cups flour

1 tsp ground flax seed (optional. but then you can say the crackers are trendy and healthy!)

1/2 cup cold water

1 tsp salt

dash of sugar

2-3 T finely chopped fresh rosemary

1/8 cup olive oil

Preheat oven to 500 with a pizza stone on a rack.

Put flour, flax, salt, sugar and rosemary in food processor. Pulse to blend. Add oil, pulse 3-4 times. Turn machine to ‘on’ and add water in stream till dough comes together. Run for about 20 seconds. Turn dough out and knead to smooth ball. Divide into four pieces and cover with a towel. Let rest 5 minutes.

Begin with one of the four dough pieces. Using a pasta roller, start on the widest setting and finish on the thinnest, just as you would for rolling out pasta dough. It helps to divide the dough one more time about mid way through the rolling process, so that one piece of dough results in two long (approx 4″ x 15″)  strips of rolled dough. I also dust the dough with flour on both sides before rolling at the thinnest setting. The two strips get baked at the same time, for a total of four batches of two strips from one cracker bread recipe. I do not begin rolling the second piece of dough until the first batch is cooked. Multi tasking for this recipe always results in burned crackers for me!

Spritz dough with water from a spray bottle and sprinkle with sea salt (or kosher) and fresh ground pepper. Slide parchment paper directly into oven onto baking stone. Flip crackers over and move from front to back of oven after about 1 minute. Watch closely. Your oven my vary. You want to flip after the dough bubbles, but is still pliable. I do this quickly by reaching in with tongs. Watch closely after that. Take out after no more than a minute — sometimes less. You don’t want them browned. There will be light brown spots or speckles and maybe an edge or two will be darkening, but that’s it. The strips will still be flexible. You can cut them into 6″ lengths at this point with a pizza cutter for uniform sizes, or wait until they are crisp and break them for a more half hazard look.

Cool completely on a rack, then package and store in festive cellophane bags to impress your friends.

If you don’t have a pizza stone large enough to bake the strips on, you can use a large cookie sheet. You will need to dramatically increase the cooking time. Watch for the dough to begin to bubble, give it another 30 seconds to a minute and then flip it. You want to take them out when they are beginning to stiffen. So if you grab one out of the oven it will bend into an arc slightly when held in the middle, but won’t bend in half.

My directions make it sound much more complicated than it is. I just wanted to be as helpful as I could be, having made many, many batches of these crackers and coming up with helpful tips along the way.

Of course, you can always watch the original video, which helps if you want to see the roller technique and oven set up.

Filed Under: Food Tagged With: gifts, pasta roller, dough, Rosemary, lavosh, la panzanella, cracker bread, no yeast

Apple Madness, Part One. Ugly-But-Useable-Apples Recipes.

October 21, 2009

Ugly But Useable Apples

Ugh.

Ugh.

I wish I could be more upbeat about this whole harvest thing, but MAN. I’m ridiculously SICK of it. How do orchard people stay happy? How does anyone stay happy? It’s just one thing after another thing after another… it’s never over. I’m never done!

aah. I digress. Again.

Not only do I sit and think “Oh my gosh, I’ve got to deal with those _______.” (fill in the blank with apples, peppers, eggplant, kale plants, beets, carrots, parsnips, etc.) But then I think “Oh my gosh, I’ve got to get that apple post up on the blog.” And then I wonder “What the hell am I even doing this stupid blog for?” For which I do not have an answer.

Aside from my petulance about all the harvest things I have yet to do, I am really, really excited smug about this pairing of apple recipes.

First, know this: I grow organic apples.

Second, know this: I grow organic apples because it is the easiest way to grow apples. You basically do nothing, versus spraying chemicals on the apples every two weeks. I can’t be counted on to do anything “every two weeks.”

Third, know this: my organic apples are very ugly and hard to give away.

Fourth, know this: I hate to waste garden food and therefore I have a lot of ugly apples. Very tasty, ugly apples. Hence this combo of recipes.

Backstory
We had two hard freezes before September was over. Normally we have a few frosts, things wind down slowly and the apples are about the last garden item to be harvested, along with carrots and parsnips. This year however, our first frost was not a frost, but a freeze. The apples were mostly OK that night (26), but a week later the temps dipped down to 20. Not 25, but 20! So I spent the day picking all the apples and sorting them into 3 piles: compost, really ugly but useable, and maybe-I-can-eat-this-apple-fresh piles.

I use the “Really Ugly but Useable” apples for pies and sauce. I basically just cut away everything gross and use what I can. Last year, I was making tons of pies to freeze. I had a bucket of peels and cores under the sink in the compost bucket. I think I might have even emptied some coffee ground on top of them. Then I read something about boiling the peels and cores to get juice that you use for apple jelly. Honestly! That’s like making food from garbage!

So I brushed the coffee grounds off the browned peels and cores and dumped them in a pan with some water and started boiling. I got only 1 pint of jelly out of it, but oh MAN, it was so insanely good! In my opinion, it’s way better than my raspberry jam that everyone seems to want. The jelly was too runny last year, but I didn’t care. This year, I was hoping I could do it better.

So here is my process. And if I may be allowed to say so, it’s brilliant. I don’t know how many other people have ugly apples, but if you do, please don’t throw them away: try this!

Apple Sauce and Apple Jelly

The ugliest useable apples go into the Sauce/Jelly pile (this is a very complicated pile system) while the prettier ones go into the Pie/Jelly pile (that’s Apples Part Two, coming soon). Just for the record, my apples are a mixture of Honey Crisp, Haralson and two mystery varieties.

I take an apple, and cut it in half, then quarters, and assess the situation:

Would your child eat this apple?

if looks OK, I cut the core out and put that in the jelly pot. The quarters go into the Sauce Pot.

1) Learn to Focus your camera. 2) Put this apple in the Sauce Pot cuz it's fine.

If it looks über yucky, I use what I can.

Yucky Apple: Just cut off the bad parts and assess

Nice bright pieces go into the Sauce Pot.

Sauce Pot Apples

Mottled brownish pieces (trails from the Apple Magot Fly) go into the Jelly Pot.

Jelly Pot Apples

I do confess that we often just eat the less disgusting brownish ones. They are only trails of worms long gone. You can hardly see some of them. Just so you know: I like to think I’m preparing my family for some apocalypse that will take place some time in the future. My kids are going to be way more immune to gross food than yours will be.

Brown Apple Maggot Fly Tunnels. Go ahead. Eat it. It's Fine!

I work my way thru the pile (which isn’t disappearing nearly fast enough). And yes, that’s a trash can and yes, it’s kind of dirty…

Are you KIDDING ME? I still have all these Ugly But Useable Sauce Apples?!

The pectin for the jelly comes from the peels and the seeds, so you need those for the jelly. The peels stay on the sauce apples because I will put those thru the food mill and they make the sauce pink, which is very pretty. I could leave the cores on the sauce apples as well, but they are helpful for the jelly and it’s easy enough to just cut those out. Is this as confusing as I think it is? It shouldn’t be…

Oh my gosh I have a terrible headache… But I still have 42% battery left on my laptop, so I must press on!

I basically just keep going until one or the other pots fill up. Then I add about 1 cup of water to the sauce apples and turn on low and cover. I almost cover the Jelly Apples with water and add a whole bunch of ROSEMARY (my favorite flavor). Do not skip this step. If you don’t have any, go buy some. Seriously.

Rosemary! My Favorite! A MUST for Apple Jelly!

Add 1/2 cup of fresh squeezed (not!) lemon juice. (I’ll squeeze up to 1/4 cup. More than that, and I use this stuff, kindly given to me by my friend Chris when I complained that real lemon juice — as opposed to RealLemon brand yucko — didn’t exist. She got this at CostCo.

This upscale, organic Lemon Juice still tastes not fresh. Oh Well.

Stir it up and turn on low, cover and cook till apples are soft, at least an hour.

Just cover jelly apples with water and add rosemary.

Once soft and tender, line a strainer with several layers of cheese cloth (or use a jelly bag, whatever the Hell that is, if you happen to have one. I do not.) set over a large bowl and pour in. Do NOT push or force apples thru.

Jelly apples strain thru cheese cloth for several hours

This mixture needs to sit a good long time, preferably overnight in a cool place. I’m thinking that maybe it’ll be cool enough on my porch tonight. Ya think?

Meanwhile enjoy the October 3rd snow...

Meanwhile, the Sauce Apples should be soft and ready to process. Put the Sauce apples thru a food mill to get rid of the peels and any seeds.

Sauce apples go thru a food mill.

I put the food mill right back over the pot they cooked in because once you are done processing them, turn the heat back up, add 1/4 c lemon juice for about 4 lbs of cut apples and sugar to taste. I added about 1/2 cup. I also add about 1 teaspoon of cinnamon because we like that. Bring to a simmer and ladle into clean, hot sterilized canning jars.

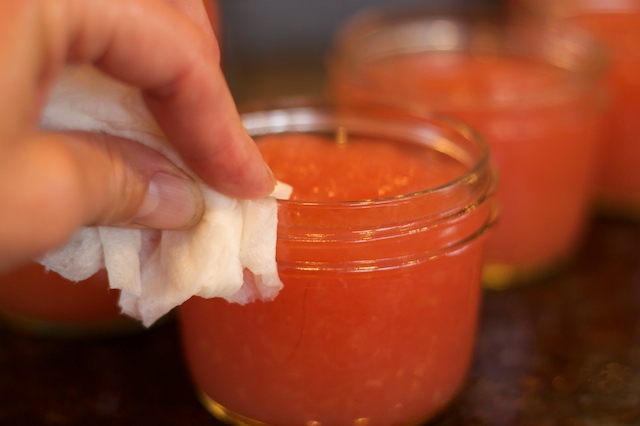
Once again, learn to focus camera as you fill sauce jars.Be sure to wipe jar rims or they won't seal!

Heat process (steam or boil) 10 minutes for 1/2 pint jars.

10 minutes for 1/2 pints.

You are now done for the day, go to bed feeling like a superstar. Tomorrow, though, it all begins again, so sleep well.

In the morning (or several hours later), put the juice from the strained apple rosemary mash into a measuring cup.

Beautiful Apple juice really for jelly making! (the next day)

I have just over 4 cups, so that means I need to add 4 cups of sugar. Put it into a big-ass pot, because the jelly needs to be cooked at a full rolling, foamy boil.

Rolling Boil to 220 degrees F

It took me about 20 minutes to reach the magic temperature of 220 degrees F. Be sure to skim off as much of the foam as possible because it makes a bigger difference for clear jellies. I don’t worry about it too much with my jam, but you can see it below, suspended in my jelly. As soon as it reaches 220, turn off the heat and ladle into hot, sterilized 1/2 pint jars, wipe the rims and seal. Heat process for 10 minutes. Refrigerate any jars that don’t seal.

Apple Rosemary Jelly (with bits of foam suspended in jar, dammit!)

See the foam? Really ticked me off, I have to say. But then, just another reason to keep it for myself.

I am just too damn good.

Apple Sauce and Apple Jelly. Leave it on your counter to admire for a couple days, then trudge it out to the garage or basement or where ever you store that type of thing.

No wait. This is just too damn good!

And this year, It’s the PERFECT consistency! So happy.

Filed Under: Food, Garden Tagged With: hard frost, harvesting, recipe, Rosemary, no pectin, Honey Crisp, Apples, Haralson, organic apples, apple jelly, apple sauce, apple maggot fly, wormy apples, ugly apples

Ancient Rosemary Cracker Bread Recipe Unearthed

March 12, 2009

Throngs of users have flooded thefreshloaf.com taking down servers in attempts to extract the secret details of Jennie Menke’s Rosemary Cracker Bread recipe, which was posted in December and only recently re-discovered by relentless Fiesta Movement fans.*

“Please,” says Menke, “Don’t all click on the link at once. I love TheFreshLoaf.com and don’t want to cause them any undue stress,” adding, “I just don’t know what to do anymore. Maybe 39 followers on Twitter is just too much.”

In order to save a lot of baking heartache, she has posted detailed directions via video, taking viewers through the recipe, step-by-step. Printed Recipe.

Rosemary Cracker Bread

* This reporter is a liar.

Filed Under: Food Tagged With: Rosemary, crackerbread, flatbread, flat bread, baking, baking stone, lavosh, la panzanella

Primary Sidebar

Read in CHRONOLOGICAL ORDER!

  • Big Bend National Park (6)
  • Alaska Road Warriors (46)

Search jenmenke.com

About Me

Jen menke

I’m a mostly-retired, pretend graphics and web developer (but don’t judge my skillz by THIS site!). We sold our dream home in Watertown, MN and downsized to a “Villa” in Excelsior, MN and built a home in our dream location of Eagle, CO and now split our time between the two states. It is truly a dichotomous life of absentee gardening and getting together with friends & family while in MN and playing hard and hermitting while in CO. I’ve let the blog go but a trip to Alaska has me resurrecting the Road Warriors series. My beloved brother is my biggest fan and I am doing this just for him.

Latest Reads:

Jennie's bookshelf: read

Trail of Broken Wings
2 of 5 stars
Trail of Broken Wings
by Sejal Badani
Started out strong and dwindled off for me. I wasn't enamored of the writing and -- maybe it's just me -- but the secrets!? I understand that you have to be willing to swallow a fair amount of incredulity when enjoying a lot of fiction, ...
The Girl on the Train
3 of 5 stars
The Girl on the Train
by Paula Hawkins
Audible book. Good, mindless listen. Pretty good action and twists. Not as good as all the hype, in my opinion, but I did enjoy. --Not enough to choose for my bookclub though: it would have been carved up by those English-teaching wolves...
I'm a Stranger Here Myself: Notes on Returning to America after Twenty Years Away
4 of 5 stars
I'm a Stranger Here Myself: Notes on Returning to America after Twenty Years Away
by Bill Bryson
Not my favorite Bryson book. However, it's been several years since I last read one and I was -- once again -- astounded by his writing style and voice. I just love him. I think this book is mostly compiled from columns he wrote over a c...

goodreads.com
  • Road Warriors
  • Garden
  • Food
  • Babble
  • Home

Copyright © 2025