• Skip to main content
  • Skip to primary sidebar

Jenmenke

Road Warrior

  • Road Warriors
  • Garden
  • Food
  • Babble
  • Home

Food

The Second Laziest Way to Preserve Your Tomatoes

September 10, 2012

Hi Everyone, just a short break in the Road Warriors “action.” I’ve been told by my “best” friend that the trip log is a little “boring” this year. I mean, I’d like to tell you there was another car wreck or a speeding ticket. Another huge fight and four more blown tires, but there simply isn’t. Deal with it. I can’t say I didn’t warn you all up front. I believe it was in the first sentence, even.

Instead of typing my boring trip journal into my computer, I am being forced, at the most furious pace, to deal with my garden. It happens every year. When will I get used to it? When will I simply harvest and compost in two easy steps? Rather than harvest, boil, peel, freeze and then compost?

I’m kidding. I don’t compost everything I freeze. It happens, for sure. In fact, I just tossed some chopped peppers of dubious origin. My best guess is that they were approaching three years old. But it could have been four. My medium-term memory has taken a serious hit in the past three — or is it four? — years. They (the peppers) went into the heap. But when you think of the time that goes in to the chopping and the freezing, it can really be a downer.

Anyway. While I’d like to tell you I made some delicious salsa with my rotting tomatoes, that would be wrong on two counts:

  1. My salsa is not delicious. It is merely OK.
  2. I didn’t make salsa because I was too lazy.

For the uninitiated, the laziest way to preserve tomatoes is to throw them into a ziplock bag and freeze them, right off off the vine. It works, people. And I’ve done it many a year. In fact now that I think about it… (I am leaving my computer with my camera and will be back in about 2 minutes.)

I am back with this photographic proof that I have done it:

I don’t have proof that it works, however if you are diligent — more diligent that I at this moment, anyway — and you scroll backwards in time, I am 100% sure you will find reference and a photo or two of these frozen globes in recipes from the past year.

The downside to the laziest way of preserving tomatoes is that as they cook, the skins peel off, break into tiny filaments, and float at the top of  whatever you are cooking them in. It isn’t a huge issue, but for picky people, it might be.

Therefore, the second laziest way is to peel them before you freeze them whole. The whole operation takes about an hour for about ten pounds of tomatoes. It’s pretty simple.

1. You wash or rub off the dirt and then cut a small “X” in the end of the tomato:

2. Then you put a whole bunch of the “X”d tomatoes into boiling water until the skins start to show signs of peeling away, about 30-60 seconds, but more if your tomatoes are really firm.

3. Scoop them out with a slotted spoon and add the next bunch. When cool enough to handle, just pull the skins off with your hands. You probably don’t even need to use a knife. I don’t even cut out the stem core.

4. Then spread them on a cookie sheet and freeze till solid. Transfer to freezer bags and use as many as you need for a recipe.

It beats sterilizing and chopping and boiling and toiling, but I still wish I could say I made salsa. I’m working on that. (The attitude, not the salsa.) Next up is raspberries, raspberries and more raspberries which are aided and abetted by edamame that went flipping nuts this year. Let me know if you want some.

Filed Under: Garden, Food

Homemade Thai Green Curry Paste

February 1, 2012

Anyone who has ever picked up a Thai cookbook will know what they say: that store-bought Thai green curry paste is but a shadow of the real thing.

Blah blah blah.

I’ve been a green curry fan since sometime in college when I first ate at Sawatdee in Minneapolis with my then-boyfriend Jim — now known as bad-boyfriend Hong Kong-Jim. [He lives there. And no, he’s not Chinese — not that there’s anything wrong with being Chinese. And he was a nice guy, just a baaaad boyfriend. ] Thai food back then was counter culture. Not popular. Dark. Exciting. Amazing. [kind of like Jim at the time…]

But now, Thai green curry is like the much-maligned Merlot. Over-sold. Over-consumed. Beneath the trendy.

I don’t care. I still love it.

Love.

It.

Since discovering Aaroy-D brand, I haven’t felt the tug that I used to — when buying green curry paste — to try making it from scratch. But then, while researching recipes that were not allowed by the New Year’s Board of Directors [see previous post], I came across a video on Rouxbe.com that re-kindled that long-forgotten urge.

So, during my last visit to a grocery store, I picked up the ingredients to make it. Came home, threw them in the ‘crisper’, and forgot all about them for about two weeks.

Because — what would a recipe given here be without the challenge of missing ingredients or ingredients gone bad? Surely there is a psychological name for this tendency of mine to sabotage perfectly good recipes.

But I did it! I made Thai green curry paste. It was so fun to make it all in a mortar and pestle — though a larger one would work better. And it was good! Different than store bought — not earth-shatteringly better — but definitely brighter tasting. Brighter is the right word. Fresher, too, but brighter and more alive would be more accurate.

I don’t think you can watch this video on Rouxbe.com without a membership — which I have and love — but these pictures are sort of a snapshot of the same thing, the main difference being that my ingredients were not as well grinded as theirs. I think this was mostly due to my smaller mortar, but also probably had something to do with two-week old lemon grass and slightly different ingredients.

Ya think? [see ingredient list below for clarification.]

First step was to grind the peppercorns with the salt. So cool how easily this was done and how pretty it looked after:

Then, after toasting the coriander (mine, from the garden, also sport some twigs from the stems alongside the seeds) and cumin seeds

you add them to the mortar and grind them up. Ahh the smell!!

Then, you add your finely chopped lemon grass. I believe nice, fresh lemongrass is a bit more forgiving that two week old, from the grocery store, probably already 3-week old lemon grass. Finely chopping mine was akin to chopping dried cattails, but I did my best to incorporate it…

Then you add chopped garlic. Again, mine was pretty dry compared to juicy fresh. I’m using up my biggest bulbs from last summer. While they still taste amazing, the textures is different.

Then the chopped cilantro stems… The recipe calls for the root of the plant, which is so cool, and which I’d have had NO PROBLEM with during the summer months. And I had the stems all chopped up sitting next to the leaves. For some reason, I accidentally threw in the whole pile of cilantro instead of just the stems. I didn’t realize I had screwed up until my paste no longer looked like paste.

I mashed and mashed and mashed…

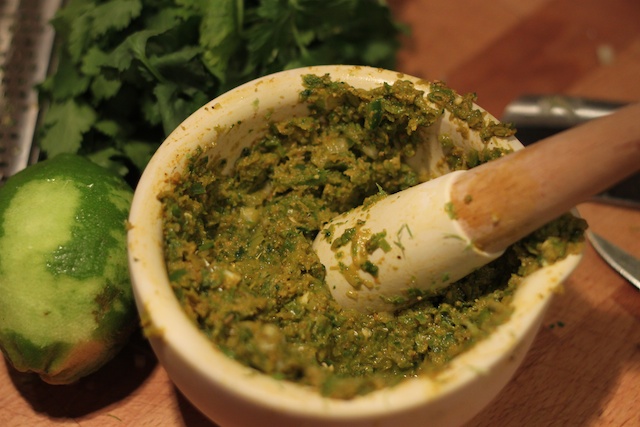
And this was the best I could do: Next you add the peppers. Jalapeño if you like spicy. I added the seeds and everything. It was HOT!

The water content from the peppers helped smooth things out considerably:

Lastly the onions:

My mortar was starting to overflow and it was hard to really go after it without slopping over the sides. But it still looked pretty good:

It made enough for two dinner-type recipes. I used half to make Thai Green Curry Coconut Shrimp:

And the rest is in my freezer waiting to be discovered sometime next year.

Thai Green Curry Paste from Rouxbe.com:

  • 1/2 tsp black peppercorns
  • 1 tsp kosher salt
  • 3 tbsp lemongrass [mine was old]
  • 1 tsp galangal [I used ginger]
  • 1 tbsp garlic [mine was old and dry]
  • 2 tbsp shallots [I used onion]
  • 2 tbsp coriander root (can substitute with cilantro stems) [I used leaves and stems]
  • 5 hot, Thai green chilies [I used 3 jalapeños]
  • 5 long green chilies [I used regular green and only 1/2]
  • 1 tsp fresh turmeric (can substitute with 1 teaspoon dried) [I used dried]
  • 1 kaffir lime [I used lime zest]
  • 3/4 tsp shrimp paste [I skipped]
  • 1 cup Thai sweet basil [I used basil paste]
  • 1 tsp coriander seeds [mine had stems]
  • 1/2 tsp cumin seeds [my only unadulterated ingredient!!]

To make the green curry paste, first prepare your mise en place. Finely mince the lemongrass, galangal, garlic, shallots, coriander root and the chilies.

Peel and mince the turmeric. Keep in mind that it will stain your cutting board, hands, and anything it comes into contact with. Gather the kaffir lime, shrimp paste and Thai basil and set aside.

In a small fry pan, toast the coriander and cumin seeds until they release their aroma and start to brown slightly.

To make the paste, use a mortar and pestle. Grind the spices, peppercorns and salt into a fine powder.

Next, add the lemongrass and pound until you reach a smooth paste, scraping down the sides as needed. Add the galangal, followed by the turmeric, making sure each is fully incorporated before adding the next. Add the garlic, cilantro stems, chilies and shallots.

Zest and add the kaffir lime, followed by the shrimp paste. Finely chop the basil and add it to the mortar and pestle, pounding everything into a smooth paste.

The paste can be kept in the refrigerator for a few days or frozen for a few months.

_________________

For the coconut curry recipe, I basically made the same one I usually do, found HERE, but I also added 1 tablespoon of fish sauce and — my newest very favorite trick:

Separating the cream from the milk in canned Thai Coconut Milk:

Usually I shake the can of coconut milk to incorporate everything together and then add it all at once, and if I have the time, cook it down a bit to thicken. But in Rouxbe.com’s recipe, they advise scooping the cream off the top and adding that to your protein and stir-frying over medium high heat until the cream separates from the oil. Frankly, mine never did this, but it did get shiny and different looking. THEN you add the watery milk and it all melds together. I really liked the consistency and it didn’t get that sort of curdled look that it can sometimes take on.


Filed Under: Food Tagged With: mortar and pestle, homemade thai green curry, coriander root, roux be.com, cumin, jalapeño, bright, fresh, fun

What Not to Bring to Thanksgiving

November 23, 2011

In a rare turn of events, I decided to try a recipe out before the big day.

Most people do that, I know. But I’m one to just throw caution to the wind.

I’m not hosting Thanksgiving this year, but I am making bread, veggies and… I’m still not sure of the last thing. I was contemplating making this super-cool recipe I saw in Bon Appetit. You make the soup inside a beautiful pumpkin or squash and that is also the serving vessel.

Here’s the picture from the magazine:

How fun is that?! Isn’t it pretty?

Of course, looking at it now, I have all kinds of comments, but first, let’s see how I did.

Recipe calls for “One 6-8lb Cinderella, cheese of Jarrahdale (Blue) pumpkin.

Amazingly, I had two of the three varieties listed sitting on my front steps in a variety of sizes. (What, on God’s green Earth is a “cheese pumpkin”?) I’d made the Jarrahdale Pumpkin for Thanksgiving last year (which is nearly identical to Sweet Meat Squash, and in fact I am not certain which one I have.) and it was delicious. I’d always heard that the Cinderella Pumpkins that I grow for decoration are also delicious. –The most I’d ever done with them was to heave them into my compost pile at the end November. I decided to use my smallest Cinderella to test the recipe since it was snowy and cold that day and it just sounded so festive!

“Won’t the kids be impressed!” I thought.

I hate cleaning pumpkins out. Truly and utterly. So, I wasn’t excited about cleaning out the Cinderella. But it was way different than a carving pumpkin. Not slimy at all.

The stem fell off this one, but I didn’t care. “It’s only for the family. I’ll save the most beautiful one for Thanksgiving day!” I murmured to myself as I happily cooked.

Next you were to rub the outside of the pumpkin with some butter, then sprinkle the inside with fennel seeds (ick! I used cumin seeds), salt and pepper. Then add 2 cups Gruyére (I used Jarlsberg cuz that’s what I had), some sliced garlic, 2 bay leaves and 1 cup of bread crumbs.

Yes bread crumbs.

No, I have no idea why.

Yes, it seemed gross to me too.

Anyway.

You are directed to set the pumpkin on a piece of parchment on a rimmed baking sheet. Finally, you add 5-7 cups of chicken stock “to come within 3 inches of the pumpkin’s rim.”

You will have to take my word for the fact that a 6-8lb pumpkin is pretty small. So unless there is some nuclear fission happening with the chicken stock there is no flippin’ way you are ever going to fit 5-7 cups of broth inside that little sucker. Also: what does “within 3 inches of the rim” mean? Does that mean don’t go above 3 inches below the rim? Does it mean fill it up so that you don’t have any more than 3 inches of space?

These are all good questions to ponder if you are a conscientious cook, which I am not.

I averaged the two gray areas, took the square root of the answer, put the lid on it and put it in the oven. (In other words, I added as much stock as I could and left about 1 inch of space from the rim.)

Over the next couple hours, I had a lot of time to ponder this ridiculous recipe, as I watched my pumpkin cook, soften, exude liquid from it’s flesh, overflow and begin to flatten.

…all while cooking in the oven on a “rimmed baking sheet.”

Isn’t that the purpose of squash? To soften completely into silky goodness? Yes, yes, you say. But now, what if that soft, silky goodness is holding chicken stock, melted cheese and 1 cup of mystery bread crumbs?

(On a rimmed baking sheet.)

As the minutes turned to hours, while I ladled cupfuls of broth out of the overflowing pumpkin, more questions began to form in my wee brain:

  • How do you get the pumpkin off the rimmed baking sheet?
  • What in the Sam Hill is the parchment paper for?
  • What happens if it collapses?
  • Why, in God’s great name, do they have you put this filled pumpkin on rimmed baking sheet?!

Anway.

The idea of this brothy soup is that you scrape the inside of the pumpkin as you serve it. Cool, huh?

No. Not cool. I started to obsess over the idea of the pumpkin collapsing in the oven and the liquid going everywhere. Actually, it wasn’t really obsessing. It was a valid concern. As soon as the time was up, I removed it from the oven. Problem was, the squash wasn’t soft enough yet. It needed to go back in.

I’m no fool. I decided to transfer the pumpkin to a baking dish that would hopefully hold the liquid if the pumpkin ruptured. Transferring it was no small feat. If you are foolhardy enough to try this recipe yourself, save yourself the ponderous questions and cook it in a big-ass pot.

I continued to cook it until it seemed soft enough to scoop:

Which it wasn’t. It never was.

Additionally, the magazine doesn’t mention a suggested serving plate, but given the dramatic vessel, it seems the dish I have it in does not do it justice at all. And yet: what happens when, as you scoop the inside, you puncture the flesh?

I can just picture my sister-in-law, as she bustles around the kitchen making sure everything is ready to begin serving Thanksgiving dinner, when I pull this fragile and potential disaster from the oven — providing it hasn’t already flooded her oven during the baking process. Can you even imagine?

And I haven’t even gotten to the soup itself!

The magazine photo shows bowls of delicate broth with sumptuous strands of melty cheese:

I refrain from subjecting you to a photo of my bowl. It tasted good enough — well except for the squash, which, how shall I put this… sucked — but was a voyeurs nightmare. Globs of cheese swirling in a murky broth with semi-disintegrated bread crumbs.

I cannot recall a more bland and stringy squash experience.

Even my chickens stuck their beaks up at it.

So no, don’t worry Sharon, I will not be bringing Baked Pumpkin Soup to your Thanksgiving table this year as previously promised. Instead, I will be bringing brussels sprouts, which, if what you say is true, not one of your family will eat.

Yes: another challenge. For I am the Morgan-family* vegetable evangelist!

Roasted Brussels Sprouts

If you want to be really nice, make them ahead so that self-proclaimed brussels-haters will not be able to harangue you with complaints of their cruciferous odor. (They stink while cooking.) Roast them ahead of time, then just heat in the microwave or toss in a hot pan before serving.

To make them, cut brussels in half, film a cast iron pan with oil and put cut-side down in the pan.

Drizzle with a little more oil, season generously with salt and pepper, and put in a hot oven (375-425, Any in that range will do). Flip them when you see the edges on the bottom start to caramelize, after about 15-20 minutes.

They are done when they nicely mottled with brown spots and are easily pierced with a sharp knife. Taste for seasoning and — if you like, and we do — splash with balsamic vinegar and serve hot.

Or, add hot crumbled bacon.

Or, add blue cheese.

Or, add all three!

Morgan will fight you to the death for the last brussels sprout. I like to think it’s because, when she was 3 or 4,  I told her they were “Barbie Lettuce.”

*For those with a confused and ponderous question of their own: Morgan is both the name of my illustrious daughter, and my maiden name.

Filed Under: Food

How much of a good thing is too much?

August 12, 2011

Garden Tomatoes.

Can you ever have too many?

Yes and no, is what I say. Yes, if you are buried under mounds of work and untended-to yard and garden chores. No, if you have all the time in the world. Like my kids seem to have…

nevermind.

I am told it is a bad year for tomatoes in these parts. In my little corner of the world, it isn’t so bad. Better than last year for sure, but not as good a a few years ago.

I think all the rain — records smashed here in Minnesota– has made them get the blight sooner for most people, though not for me. I struggle with that particular problem every year, no matter where I plant them, what they are mulched with, or how much rain we get. Blight just seems to be my lot in life.

I accept that.

Right now though, I’ve got tomatoes coming out my ears. I picked a full bowl yesterday.

And left at least that many more on the vine. Making salsa is out of the question. I have no time. Hopefully I will soon, but even if I did have the time, there is something about preserving garden surplus that just doesn’t sit well with me in August.

Why is that? The most I seem to be able to do is chop and freeze. Or, on a really good day, roast, puree and freeze.

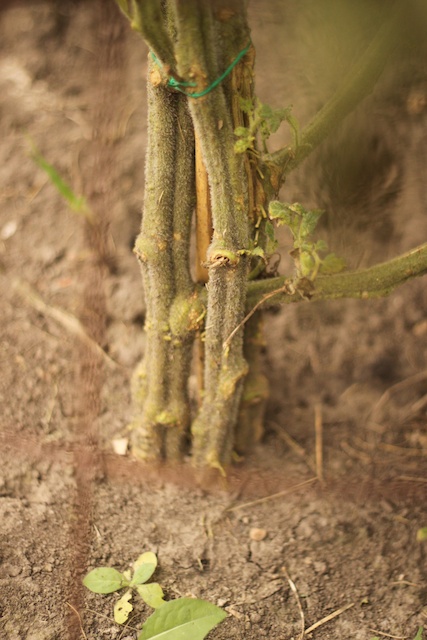
One thing I meant to write about earlier in the season was the strange way the plants were sold by the nursery this year. I bought them from a different place than usual since I was so behind schedule and had to pick them up when I could find them. Sadly, I had no time for a special trip to my local grower. I found my main-stay Brandywine in a fairly large sized pot while shopping for flowers and bought two pots. Oddly, this nursery had allowed several seedlings in the same pot to grow. So instead of having one sturdy seedling, there were about six. My understanding has always been that this is a huge no-no, so I asked one of the people at the nursery and they said not to pinch any back, but to let them all grow. I’m still not sure if they knew what they were talking about, but at the very least, because I also planted a pot with a only single seedling, it would prove to be a fun experiment.

With pretty much no conclusion.

At this stage in the game, when compared to my single-seedling plants there isn’t much difference. I can’t even say for sure if the multi-seedling plants were more susceptible to the blight or not. That was my hunch, but I would guess, from looking at them planted all together, that blight damage is more a factor of proximity to another blight-damaged plant than to multiple seedlings in a single planting.

This is a very boring post, isn’t it.

Anyway, getting back to the title, “how much is too much”, it really didn’t refer to the harvest. It pointed back to the eating. How much is too much?

Is this too much?

Because that was my lunch yesterday. I decided to eat the split tomatoes before the fruit flies (curiously absent so far this year) found the leaking fruits. But there were three (!) split tomatoes.

So I ate them all.

Is that too much?

Is that gluttony?

I tempered it with some fresh moz. I love fresh mozzarella. Sometimes I think the tomatoes are just an excuse.

I also heaped the rest of my quinoa salad on the side. Which I thought I had already posted here, but I apparently did not. Or did I? I can’t find it. Can anyone help me resolve this burning question?

Anyway, this salad is SO GOOD! Make some today or as soon as the temperature starts to melt you. It keeps in the fridge for about 3 weeks.

I’m kidding. Not three weeks. More like 1 or 2. Just smell it for gawd sake. Everyone is so flipping freaked about about things going bad! Just SMELL IT! If there isn’t anything funky growing on it and smells the same, eat it and stop being so paranoid. I’m still alive. That should give you some confidence.

Or not.

Quinoa Salad with Fresh Anything

  • 2 cups quinoa, rinsed (skip the rinse if you are lazy like me)
  • 2 teaspoons salt
  • 1/4 cup fresh-squeezed lemon juice (more or less to taste)
  • 1/4 cup olive oil
  • various fresh veggies diced: onion, cucumber, tomato, sugar snap peas, asparagus, sweet peppers, fresh raw corn, etc.
  • 2T chopped fresh herbs: any combo or single addition of basil, mint, cilantro.
In a medium saucepan, add a film of olive oil and toast quinoa over medium heat for about 5 minutes it starts to smell good. Again, if you are über lazy, you may skip this step. It just adds a dimension to the flavor. Add 3 cups of water and 2t salt to pan and bring to a boil, then turn to low, cover and simmer about 12-15 minutes. Fluff and cool.
In a large bowl, whisk lemon juice and olive oil together. Add add quinoa and diced veggies. Stir in chopped herbs. Salt and pepper to taste. A stunning additions is — of course — diced, fresh mozzarella. Another thing I tried was left-over strips of warm flank steak. It was yum!

Filed Under: Garden, Food Tagged With: salad, tomato, tomatoes, how to plant, Growing, quinoa, blight

Preserved Lemons? Or Yellow Orbs of Death?

June 10, 2011

That is the question.

A question, I hope, that I have answered, since we are now actively eating them. No one has died. No one has even gotten a stomach ache. So, hopefully we’ve ruled out botulism.

I’m sure that inspires you not. But, who knows. You sit here reading this blog, don’t you? Who am I to make judgements about what you actually will, or will not, do?

Am I endorsing the making of preserved lemons? No. No, I’m not. Frankly, I don’t think they are all that. But then, maybe I made them wrong. Well, I mean, I know I made them wrong, as you will soon see. But you are still eating lemon rinds, for pete sake. How good can they actually be, even if you have made them right? (This is where my faithful readers should chime in and tell me how wonderful preserved lemons are.)

But hopefully, you all know me well enough to know that, dammitalltohellanyway, I will be making them again. The right way. Just to see if I am missing some gourmand gene that allows me to swoon over preserved lemons like my friends do.

For your ensured longevity, I will be giving you the correct technique for preserving lemons. For your reading pleasure, I will tell you how I preserved mine.

Correct Technique #1: Start small. Buy 8-10 lemons. Use a quart canning jar. Because, you will probably never eat them all anyway.

Incorrect Technique #1: Buy a 20 lb bag of lemons at Costco. Buy a 2-gallon canning jar at Sur La Table.

Correct Technique #2: Optional. Soak the lemons in water to soften the rind for three days, changing the water daily.

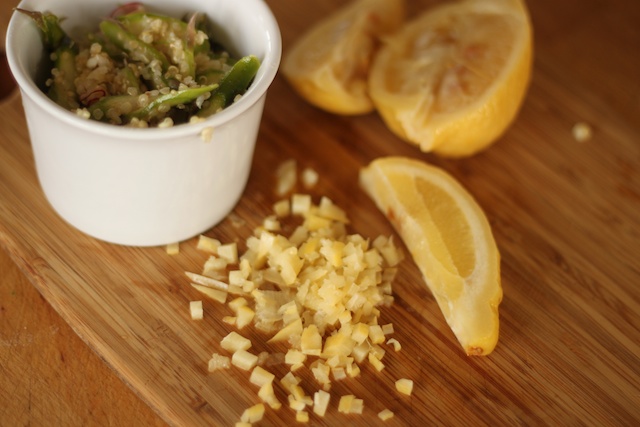
Correct Technique #3: Cut the lemons in half lengthwise almost through to the other side, leaving the stem end intact. Rotate 90 degrees and cut again lengthwise so it is quartered, again leaving the base intact. You should be able to open the lemon like a flower. Sprinkle the insides of the lemon generously with salt.

Correct Technique #4: Put 2 tablespoons of salt in the bottom of the sterilized jar and pack lemons tightly into the jar, squishing them mercilessly so that juice is extracted and rises above the packed lemons. If necessary, add more freshly squeezed lemon juice** to cover lemons. Top off with another 2 tablespoons of salt. Seal jar and put in a dark, cool place. Every few days, tip jar over to move the juices around. The lemons will be ready in about 30 days.

Incorrect Techniques #2, #3 & #4: After preparing the lemons, pack them into the far-too-large jar. Decide that looks are more important than preservation, and spend a lot of time making the lemons look good inside the jar. You’ll be putting these on your counter, right? Next, after realizing you will need another 20 lb bag of lemons from Costco in order to come up with enough fresh juice to cover them, determine that the bottled organic 100% lemon juice you have in the refrigerator from Costco is just as good a freshly squeezed. Add everything you’ve got. Note that your lemons still are not covered with juice. Since your lemons are not squeezed and packed tight into your jar, they are free to bob around inside and float to the top. Because you are now out of 100% fresh organic bottled juice, and suddenly understanding that you will need another 4-5 cups of juice, since the damn lemons float, add a little water. (This is a cognizant and flagrant departure from the the very vague recipe your dear friend verbally related to you at bookclub about four months ago. And it feels…wrong.) As you begin to add the water, you have a better idea. Isn’t olive oil a preserving ingredient? And maybe the lemons won’t float so much in the oil. Great idea! You are a good ad-libber! You add about an inch of olive oil to the top. Since you have yet to have your very handy MacBook Air in the kitchen with you to quickly and easily google a recipe, and since you are also very late on time, you do not bother your sometimes-pretty little head about this detail. You cook and can all the time. It will be fine. You shut the lid and put it in a dark, cool place.

(To ferment.)

The lemons will be ready in about 30 days.

Correct Technique #5: Enjoy your safely-perserved and no-doubt delicious lemons by removing a lemon with a clean untensil to prevent contaminating the container with bacteria. Cut the lemon (rind only or rind and flesh) in small pieces and add to what ever you want a bright citrus note. A little goes a long way. (Or so I’m told.)

Incorrect Techniques #5, #6 & #7: You are excited to try these delightful things.

Carefully open your overly large jar of bobbing lemons. (Learn from the master here and consider safety goggles.) Stand back as the flip top explodes off the jar backward on its hinge and bruises your hand.

Hmmm. Can that be right?

Since you now DO have your MacBook Air in the kitchen with you (safely ensconced with a user password so your Facebook stalking daughter can’t steal it), google, “What should preserved lemons look like.” Spend a lot of time that you do not have reading about all the things you did wrong. Stir the lemons around to release all the carbonation and re-cap. Store in a cool, dark place for another 30 days.

Maybe they will go away.

Since they don’t go away, and since your very well-intentioned husband continues to buy way more than you need during his pilgrimages to Costco, re-organize your cool, dark pantry. Push the lemons to the left. Dust the glass. Stare at the swirling liquid. Shut the pantry door.

It’s time to vacuum and mop. And yes, it’s time to do the pantry floor. Move the preserved lemons to the right. Mop underneath. Move them back. Shut the door.

Can they really be that bad? Maybe the carbonation is normal. Maybe the carbonation is gone. Open the jar by protecting your hands with several layers of towels. (Brilliant idea, by the way.)

No, the carbonation is still there, gurgling to the top long after the lid is opened.

On the positive side, there is no obvious mold and they smell delightful!

Spend more time reading about preserved lemons. Try not to focus on the fact that you highly suspect you don’t even really like preserved lemons and that this is nothing but a stubborn and giant waste of time.

You learn:

  • the carbonation is from the bottled lemon juice. A well-known no-no with no explanation as to why.
  • other cooks have also experienced bubbly preserved lemons, asking if this is ‘normal’ on cooking sites, forums and places like yahoo answers — which, from my experience is not a place for answers.
  • in these forums, no one has screamed (in capital letters) DON’T EAT THEM! DANGER! DANGER! They only say things like, “no, that is not normal. did you use bottled lemon juice?”
  • olive oil is mentioned no where.
  • botulism is a scary, strange, odorless, deadly bacteria. I do not want botulism. However, it is unlikely to grow in so much salt and acid. (I did not learn that on yahoo answers.)
  • you have made non-lethal, slightly fermented, preserved lemons. Something closer to limoncello, the Italian lemon liqueur. (This is not necessarily a bad thing.)

You decide:

  • you will try these “preserved lemons” by first eating them yourself. You have lived a good life. Even if you die, you will have time to say goodbye to loved ones.
  • they are OK. Nothing so great as to merit all this angst, however.
  • you live, unscathed, and begin to serve them in everything, including the hot new Asparagus Quinoa Salad, where you think they actually might deserve a permanent spot.

And finally, next time, you will follow the recipe.

** Only fresh squeezed, out of the fresh, yellow fruit, juice. Not bottled. Not water. No olive oil.


Filed Under: Food Tagged With: recipe, preserved lemons, carbonated preserved lemons, what preserved lemons should look like

Stop the Insanity!

June 6, 2011

(Insanity as in asparagus.)

As I was working in the garden this weekend —  planting almost the remainder of the seeds — it occurred to me that the date was June 5th. Or 6th. I’m still not sure of the date because Charlie was using my watch this weekend to referee a soccer game and the strap broke. Note that in the picture above, I do have my watch on, which is confusing to say the least. I can neither remember the order of events, nor explain them to you. Just know that I speak the truth.)

(Yes, I yelled at him. And, yes, he denied any wrong-doing. So, yessss, I yelled some more and told him to bear some responsibility for the the things that just seem to “happen” to him all the time. “Be accountable,” I yelled!)

Anyway, that’s the only way I know what the date is, to look on my watch. Even that, as a source, is failing me mightily since the numbers are about two millimeters high and I can barely even see them anymore.

But I digress.

As I was working in the garden, it occurred to me that it was early June. The fact that I was in the middle of my insane asparagus bounty and still planting seeds shocked me. As I contemplated what I would say in this post, I realized that I would be writing for a small audience –only Minnesotans — for who else in this world considers June to be Spring?

Who cares, really? If you have fresh, tender asparagus, I’ve got a tip for you: keep it raw and put it in a salad. I won’t go so far as to tell you to eat spear after spear raw, like my dad does — because I think it tastes like grass — but in an effort to plow through a ridiculously large pile of the stuff after being gone for the weekend, I decided to try it in some salads. I made refrigerator pickles (good, but what isn’t good when soaking in sugar and vinegar?) and an asparagus quinoa salad (amazing!)

I highly recommend you try it. I’ve made the salad twice now, once with quinoa and once with bulgar wheat. Both were good and had their benefits. The quinoa was more fun to eat since the tiny grains burst and pop in your mouth like the little fish eggs on sushi (that sounds so gross, but it’s true). The bulgar had more eye-appeal since it had — at least the way I cooked it — less moisture and more contrast.

The salad would also be good with barley or orzo pasta.

I tried various implements to slice the asparagus razor thin and defaulted to a knife. The mandolin was a pain (and dangerous) because the asparagus tends to have a lengthwise fiber to it which interferes with the mandolin. Most of my stalks had this split toward the bottom:


…which is maybe a factor of them being so tall when I picked them. But made the slices less pretty. A vegetable peeler is great if you want long strips, but I found long strips to be too cumbersome to eat. So I just used a knife and cut them on the diagonal. Then I used the mandolin on a super thin setting and sliced up two radishes.

I also added garbanzos, toasted pine nuts, shaved pecorino (as always, my cheap and beloved substitute for ridiculously priced parmesan).

The quinoa was super salty (I like it like that) and a little “wet” (I don’t like it like that.)

I’m not a quinoa expert. I’m not even a novice. Is this the right texture??

Anyway, I dressed it with lemon juice and olive oil, salt and pepper. Who knew something that stupidly simple could taste so good? (Seriously. I did not know that.)

Asparagus Salad with Grains

  • 3/4 cup quinoa (or bulger or other grain) cooked according to package directions, but be sure to season with salt!
  • approx 8 thinly sliced raw asparagus spears
  • big handful pine nuts, toasted
  • 1 can of garbanzo beans rinsed and drained
  • 2 radishes, very thinly sliced
  • shaved pecorino or parmesan to taste
  • 1/4 – 1/2 fresh lemon, squeezed (amount to taste. start with 1/4 and add more if necessary)
  • 1/8 – 1/4 c olive oil (same as above. add more as necessary. I added 1/8 c with the wetter quinoa and 1/4 c with the drier bulgar wheat

Toss together all ingredients. It lasts for days in the refrigerator!

Here is a picture of what it looks like with bulgar wheat:

This is a spoiler alert, but I also added preserved lemon to my second batch. That’s fodder for another post, as you’ll see why later in the week, but it was good.

And as a point of reference in my ongoing battle of the asparagus bulge, here is a before and after of the pile:

Before making salads:

After:
Either I’m a bad photographer, or that pile didn’t change much.

Filed Under: Garden, Food Tagged With: pine nuts, garbanzo, asparagus salad, asparagus, spring, lemon, pecorino, quinoa, preserved lemon, bulgar wheat, radish

  • « Go to Previous Page
  • Page 1
  • Page 2
  • Page 3
  • Page 4
  • Page 5
  • Interim pages omitted …
  • Page 19
  • Go to Next Page »

Primary Sidebar

Read in CHRONOLOGICAL ORDER!

  • Big Bend National Park (6)
  • Alaska Road Warriors (46)

Search jenmenke.com

About Me

Jen menke

I’m a mostly-retired, pretend graphics and web developer (but don’t judge my skillz by THIS site!). We sold our dream home in Watertown, MN and downsized to a “Villa” in Excelsior, MN and built a home in our dream location of Eagle, CO and now split our time between the two states. It is truly a dichotomous life of absentee gardening and getting together with friends & family while in MN and playing hard and hermitting while in CO. I’ve let the blog go but a trip to Alaska has me resurrecting the Road Warriors series. My beloved brother is my biggest fan and I am doing this just for him.

Latest Reads:

Jennie's bookshelf: read

Trail of Broken Wings
2 of 5 stars
Trail of Broken Wings
by Sejal Badani
Started out strong and dwindled off for me. I wasn't enamored of the writing and -- maybe it's just me -- but the secrets!? I understand that you have to be willing to swallow a fair amount of incredulity when enjoying a lot of fiction, ...
The Girl on the Train
3 of 5 stars
The Girl on the Train
by Paula Hawkins
Audible book. Good, mindless listen. Pretty good action and twists. Not as good as all the hype, in my opinion, but I did enjoy. --Not enough to choose for my bookclub though: it would have been carved up by those English-teaching wolves...
I'm a Stranger Here Myself: Notes on Returning to America after Twenty Years Away
4 of 5 stars
I'm a Stranger Here Myself: Notes on Returning to America after Twenty Years Away
by Bill Bryson
Not my favorite Bryson book. However, it's been several years since I last read one and I was -- once again -- astounded by his writing style and voice. I just love him. I think this book is mostly compiled from columns he wrote over a c...

goodreads.com
  • Road Warriors
  • Garden
  • Food
  • Babble
  • Home

Copyright © 2025